
Caesar II FAQ
I. HOW TO PLAY
1. INTRODUCTION
Well, Caesar IV is out. Caesar/Impressions fans who cut their teeth on Caesar III will find gameplay very familiar and enjoyable. Caesar II is a city-building strategy. The player advances from province to province, building cities, nurturing them to prosperity, and defending them from attack. The ultimate goal is to become the next Caesar.
This guide is written for the Windows/DOS game Caesar II, Version 1.0 – September 14, 1995. Most or all of the guide applies to the Mac version or the patched version. This guide does not substitute for the manual; Beginning players are advised to read the manual or play the tutorial. Most of the information was obtained empirically, with a small part from the manual.
2. KEYBOARD SHORTCUTS
F1       View City
F2 or F  View Forum
F3       View Province
F4       Load game
F5       Save game
< and >  Rotate view
+ and -  Zoom in and out
1-3      Set zoom level
C        Display population and employment rate
A        Toggle fast/normal time (double tap to move forward in time slightly)
Y or N   Answer yes or no
SPACE    Cancel building construction (press before releasing left mouse button)
3. CITY, PROVINCE, FORUM VIEWS
There are three views in Caesar II. Housing, businesses and services are built and maintained on the city level. Resource production and trade routes, as well as barbarians, your cohorts, and army combat, are managed on the province level. Finally, the Forum is where you can get reports from and issue commands to your governerial advisors.
Right-click on any object in the City or Province views to query it. This will give you information on the land value and services available in a location, the state of a dwelling’s evolution or the productivity of a business, or allow you to hear the what walkers have to say.
Time passes normally on the City and Province levels, except when paused, but it is always paused on the Forum level. Most updates occur monthly, at the beginning of the month. Examples include the number available plebs, the amount of goods in a warehouse, and the state of a business. Two exceptions are the evolution of dwellings and the population of the city, which change in the middle of the month.
4. MONEY
Money (Denarii) is needed for almost everything in Caesar II. To succeed you will need to understand how money is stored, how it is spent, how it is gained, and how it is wasted. There are two locations for storing money: city funds and personal savings.
City funds are needed to pay construction costs, pay monthly fees for heavy infantry, mercenaries and plebs, and pay tribute to Caesar at the end of the year. Your monthly salary, which can be freely set up to 1000 Dn. by the Personal advisor in the Forum, also comes out of the city funds. When beginning a new province you are given a certain amount of money in the city funds that depends on the difficulty level and your progress through the game. You will need to maintain city funds by bringing in residential and industry taxes. Failure to pay tribute to Rome three years in a row will result in game over.
City funds are at risk of being stolen by your own citizens. This can be avoided by building worship structures that are under internal or external security (or both) to act as bank vaults. Larger structures can store more funds. Proper temple management can prevent all robberies.
When leaving a province the city funds are left behind, but personal savings are retained. Personal savings have two purposes: donate them to the city funds or give them as a gift to Caesar to improve his favor toward you. In later provinces donations will be necessary to get the economy up and running, or to get it running sooner. Like city funds, your savings can also be stolen — in the form of taxes paid to Caesar. Taxes cannot be avoided but they can be predicted and minimized.
The following table summarizes the differences between city and personal funds, and shows the interplay between them:
Money location       Transfer by             Spend on             Lose by
City funds           Donating to city        Current province     Robberies
Personal savings     Setting your salary     Future provinces     Caesar's tax
5. OBJECTIVES
There are four aspects of your province that must be adequately developed before you can advance; A minimum rating for each must be met, as well as a minimum average of all four. To see your current ratings and goals, visit the Oracle in the forum. You can get advice by clicking on the columns.
- Empire: Conquer barbarian tribes to convert them to Roman towns; connect the main city and Roman towns with roads. Connect to border
towns. Build ports to harbor ships from neighboring provinces, and connect the ports as well. Maintain adequate favor with the emperor. - Peace: Prevent riots from occurring, and prevent barbarians from entering the city. Prevent property damage caused by rioters or barbarians. Defeat any barbarian force with your cohorts. Peace will rise 2 points for every year of non-destruction, and 3 points for any enemy force defeated by your cohorts.
- Prosperity: Increase city population. Develop housing and collect housing tax. Develop industry and collect industry tax. Achieve a
profit each fiscal year. - Culture: Build a) worship structures, b) entertainment structures, and c) land value structures (sanitation, education, and amenities).
All of these structures must lie within the infuence of forums in order to count towards Culture. Culture may be held back by a low city population.
6. GAME MODE AND DIFFICULTY LEVEL
Before beginning a game it is necessary to choose whether to play the full campaign or just the city. The city-only mode is open ended, with no goals to meet, no barbarian threats, no trade or resource management, and no advancement to other provinces. This is useful for orientation and experimentation, but as it has no real objective, there is not much to discuss.
Next decide on the difficulty level. Higher difficulties require more promotions to finish the game, yield less money at the start of each province, require higher goals to be met for promotion, and may have other effects.
Difficulty   Promotions   Starting money    Req. goals
Novice                5            20000      -1 level
Easy                  7            15000      -1 level
Normal               10            12000       default
Hard                 15             7000      +1 level
Impossible           20             5000      +1 level
The starting money is reduced by 250 on each successive province. The goals increase
with rank. The following are for normal difficulty.
Rank       Individual    Average
Citizen           20%        30%
Decurion          25         35
Apparitor         30         40
Magistrate        35         45
Quaestor          40         50
Procurator        45         55
Aedile            50         60
Praetor           55         65
Proconsul         60         70
Consul            65         74
II. DEVELOPING HOUSING
1. HOUSING EVOLUTION
Housing is where your citizens live. In order for people to move to the city you must first set up housing. Starting at the most basic dwelling, One Hut, housing may advance through 32 grades of affluence depending on land value and available services. All structures (see section II.2) and the housing units themselves affect land value to a certain radius. Each successive grade of housing requires higher land value. Some grades also require services provided by other structures, with the highest grades requiring all possible services. A unit of housing can evolve at a maximum rate of one grade per month if provided with all its needs and wants.
The highest levels of housing pay massive amounts in taxes, which can far exceed the revenues acquired from industry. Ensuring that houses pay their taxes is not difficult because they need forum access to evolve, unlike in Caesar III. Taxes should not be raised about 7-8%, or unrest and spontaneous devaluation of land values may result.
Housing development requirements
Grade            Size    Occu-     Pop.  Req. land  Required service
                         pancy   density   value
One hut             1        2       2       0
Two huts            1        4       4       2
Three huts          1        6       6       4      Primitive water
Communal hut        1        8       8       6
Large communal hut  1       10      10       8      Forum
Primitive house     1       12      12      10
Simple house        1        6       6      12
Small house         1        7       7      14      Market
Average house       1        8       8      16      Advanced water
Improved house      1        9       9      18      Bath house
Large house         1       12      12      20      Entertainment 1
Grand house         1       16      16      22
Primitive insula    1       20      20      24      Single security
Simple insula       1       24      24      26      Entertainment 2
Small insula        1       28      28      28      Entertainment 3
Average insula      1       32      32      30      Hospital**
Improved insula     1       36      36      32      Entertainment 4
Large insula        1       42      42      34      Grammaticus
Grand insula        1       48      48      36
Imperial insula     1       54      54      38      Entertainment 5
Simple domus        1       20      20      40
Small domus         1       25      25      42      Double security
Average domus       1       30      30      44      Entertainment 6
Improved domus      1       35      35      46      Rhetor, Library**
Large domus         1       40      40      48      Entertainment 7
Grand domus         1       45      45      50
Simple villa        2      100      25      54
Small villa         2      120      30      54
Improved villa      2      150      38      56      Entertainment 8
Grand villa         2      200      50      58
Small palace        3      300      33      60      Entertainment 9
Large palace        3      500      56      64
** Each grade after Average Insula requires successively more Hospital access. Likewise with Improved Domus and Library access. The coverage requirement reaches 100% at Large palace.
2. CITY BUILDINGS
Other than housing, there are three types of buildings:
- Road-independent structures: Those that function with or without road access. Whether they affect housing depends only on the distance from the building to the house.
- Walker-producing structures: Those that send walkers out onto adjacent roads. The building’s influence is spread by a radius of 3 from every road tile the walker traverses, and lingers for some time. The walker goes in a random direction when he encounters an intersection. Additionally, the building’s service spreads for 3 tiles from the building itself.
- Forum-dependent structures: Those that require forum access in order to work. When passed by a forum walker this building provides its service to the whole city, but can only serve a limited number of citizens. If the service of all the structures is not sufficient for the population of the city, every dwelling in the city will have coverage of less than 100%.
Concerning size, the single numbers given refer to an NxN square. As for radius, the numbers given are the number of tiles past the edge of the structure to which the effect extends. The radius draws out a square, not a circle. There are two numbers for land value: the first is the bonus to land value and the second is the radius to which that bonus extends.
Road-independent structures
Structure         Cost   Size    Land    Service  Citizens   Notes
                                value     radius  employed
  WATER
Natural sources      0      1       0          3         0   Simple water
Well                20      1       0          2         0   Simple water
Reservoir (1)       50      1       0                    0   Advanced water
1st, 2nd in series                           3,6
3rd in series                                2,5
4th in series                                1,4
Fountain            15      1     2;2          6         0   Advanced water
  SANITATION
Bath house          30      2                           20
1st grade                         3;3          5
2nd grade                         4;3          6
3rd grade                         5;3          7
4th grade                         6;3          8
  ENTERTAINMENT (2)
Theater            300      2     3;2      5,7,9        25   Type A
Odeum              500      2     3;4     7,9,11        30   Type A
Arena              700      3     4;3      5,7,9        50   Type B
Coliseum          1000      3     4;5     7,9,11        60   Type B
Circus            1500    --see (3)--     6,8,10        80   Type C
Circus Maximus    2500    --see (3)--    8,10,12        96   Type C
  EDUCATION
Grammaticus        250      2     3;2          6        30
Rhetor             500      3     4;4          8        80
  SECURITY (4)
Wall                20      1       0        n/a         0   External security
Tower (5)           75      1       0        n/a         0   External security
Gateway              5      1     2;1        n/a         0   External security
  WORSHIP
Shrine              80      1                n/a        10
1st grade                         5;2
2nd grade                         6;2                        Req. pop. 500
3rd grade                         7;3                        Req. pop. 2000
4th grade                         8;3                        Req. pop. 5000
Temple             200      2                n/a        20
1st grade                         6;2
2nd grade                         7;3                        Req. pop. 1000
3rd grade                         8;3                        Req. pop. 4000
4th grade                         9;4                        Req. pop. 10000
Basilica           600      3                n/a        30
1st grade                         7;3
2nd grade                         8;3                        Req. pop. 1500
3rd grade                         9;4                        Req. pop. 6000
4th grade                        10;4                        Req. pop. 15000
  AMENITIES
Gardens              3      1     2;2        n/a         0
Plaza (4)           12      1     4;1        n/a         0

Walker-producing structures
Structure         Cost   Size    Land   Distance  Citizens
                                value     walked  employed
  FORUMS (6)
Aventine           100      2                 36        40
1st grade                         2;2
2nd grade                         3;2
3rd grade                         4;2
4th grade                         5;3
Janiculan          400      3                 36        80
1st grade                         3;2
2nd grade                         4;2
3rd grade                         5;3
4th grade                         6;3
Palatine          1500      4                 36       120
1st grade                         3;2
2nd grade                         4;3
3rd grade                         5;3
4th grade                         6;4
  SECURITY (4)
Praefecture        100      1     3;2         40        25   Internal security
Barracks           400      3     3;2         70        30   Internal security
  INDUSTRY
Market              40      2     2;1         28        20
Business            80      3     2;1         28        60

Forum-dependent structures
Structure         Cost   Size    Land   Citizens  Citizens
                                value     served  employed
Hospital           500      3     4;3       1000        80
Library           1000      3     4;4       1200        60
(1) Reservoirs provide two services, hence two numbers: pipe access and water access. Pipe access is required for fountains and baths to work. The service radius depends on how far down the chain the reservoir is. Wells and natural sources provide primite water; reservoirs and fountains provide advanced water.
(2) Entertainment structures provide varying amounts of service depending on distance. The three numbers are the distances for 3, 2 and 1 points of entertainment, respectively. Each location can receive up to 3 points of each entertainment type. Entertainment points are NOT additive — for example if a location gets 2 points from one theater and 1 point from another theater, it will only have 2 points of type A entertainment.
(3) The Circus and Circus Maximus are unusual in shape and land value effect.
The drawings below illustrate:
4 4 4 8 8 8 8 8 8 8 8 4 4 4        5 5 5 5 0 0 0 0 0 0 0 0 0 0 0 0 5 5 5 5
4 4 4 8 8 8 8 8 8 8 8 4 4 4        5 5 5 5 0 0 0 0 0 0 0 0 0 0 0 0 5 5 5 5
4 4 4 8 8 8 8 8 8 8 8 4 4 4        5 5 5 5 0 0 0 0 0 0 0 0 0 0 0 0 5 5 5 5
4 4 4 8 8 8 8 8 8 8 8 4 4 4        5 5 5 5 0 0 0 0 0 0 0 0 0 0 0 0 5 5 5 5
4 4 4 8 - - - - - - 8 4 4 4        5 5 5 5 0 0 0 0 0 0 0 0 0 0 0 0 5 5 5 5
4 4 4 8 | Circus  | 8 4 4 4        5 5 5 5 0 0 0 0 0 0 0 0 0 0 0 0 5 5 5 5
4 4 4 8 - - - - - - 8 4 4 4        5 5 5 5 0 0 - - - - - - - - 0 0 5 5 5 5
4 4 4 8 8 8 8 8 8 8 8 4 4 4        5 5 5 5 0 0 |   Circus    | 0 0 5 5 5 5
4 4 4 8 8 8 8 8 8 8 8 4 4 4        5 5 5 5 0 0 |   Maximus   | 0 0 5 5 5 5
4 4 4 8 8 8 8 8 8 8 8 4 4 4        5 5 5 5 0 0 - - - - - - - - 0 0 5 5 5 5
4 4 4 8 8 8 8 8 8 8 8 4 4 4        5 5 5 5 0 0 0 0 0 0 0 0 0 0 0 0 5 5 5 5
                                   5 5 5 5 0 0 0 0 0 0 0 0 0 0 0 0 5 5 5 5
                                   5 5 5 5 0 0 0 0 0 0 0 0 0 0 0 0 5 5 5 5
                                   5 5 5 5 0 0 0 0 0 0 0 0 0 0 0 0 5 5 5 5
             '0' stands for 10 ->  5 5 5 5 0 0 0 0 0 0 0 0 0 0 0 0 5 5 5 5
                                   5 5 5 5 0 0 0 0 0 0 0 0 0 0 0 0 5 5 5 5
(4) An area must be fully enclosed by some combination of walls, towers, gates and river for about a year before it is considered covered by external security.
A location must be passed by a prefecture or barracks walker to be covered by internal security.
(5) Towers may be built on clear land or on an already built wall. Plazas may only be built on clear land, and not on top of road.
(6) All walker-producing buildings except the higher forums send out a walker once every four months. The wait period is three months for the Janiculan forum and two for the Palatine forum.
3. LAND VALUES
Other structures beside housing are affected by land value and evolve accordingly: fountains, baths, forums and worship buildings. Except in the case of fountains, these evolutions cause the structures to raise nearby land values further. There are population requirements that must be met before advanced forums can be built and before worship buildings can evolve.
Structure      Req. land value
2nd grade      17
3rd grade      33
4th grade      49
Some structures, even while raising land values, also put upper limits on them. These limits apply to any structure sensitive to land value, not just housing. This will have a major impact on your city design, especially with regard to placement of businesses; if housing is placed too close to these buildings it will limit
their evolution.
Structure     Radius   Land value limit
Business      1        10
              2        16
              3,4      26
Barracks      3        24
Wall/Tower    2        26
Gate          2        30
Praefecture   2        34
Market        2        40
4. POPULATION REQUIREMENTS
Some structures require a population milestone to be passed to become available. Once the requirement has been met it is still possible to build them if the population drops below the milestone. (Advanced worship structures do not work this way; they will devolve if the population drops.)
Structure          Required population
Janiculan Forum     400
Odeum               800
Library            1200
Palatine Forum     1800
Coliseum           2400
Circus Maximus     4800
III. DEVELOPING INDUSTRY
Unlike in Caesar III, goods are not required to develop housing, only services and land value. Therefore, it is possible to build a great city without any commerce. However, there are two very good reasons to build up industry: It provides tax revenue, and it employs citizens. To successfully develop business it is necessary to understand the concepts of supply, demand and distribution as they apply to Caesar II.
1. SUPPLY
Each of the up to eight goods available in each province has one of three sources: Local production, land import, and sea import. Local production requires a farm, mine, or quarry (250 Dn) with road access, at least one warehouse (150 Dn), a work camp (100 Dn) and up to 30 plebs for labor (~4-7 Dn/month). Land import requires road access to a border town, a trading post (500 Dn) and at least one warehouse (150 Dn). Sea import requires road access to a port (1000 Dn), and at least one warehouse (150 Dn). The port must be placed in the path of the trading vessels in order for trade to occur.
The rate of supply is different for each source:
Production of local resources depends on the staffing of the work camp adjacent to the production site. The rate of work camp filling is limited to one third per month, and it takes several months to reach full production. A fully staffed source will produce up to 4 units per month, with the actual rate varying monthly in a random way. The overall rate depends on the province. Earlier provinces put out nearly 3 a month, while the hardest provinces have extremely bad productivity, less than 1 per month.
The staffing of every camp in the province will be the number of plebs assigned, divided by 30 times the number of work camps: Divide by three and round down to determine the staffing in thirds. You cannot control the staffing of individual camps. Thus it is your interest to build work camps only when and where needed. It is possible to build more than one work camp per source, but this offers no advantage. However, sources are sometimes close enough that you can staff more than one with a single camp.
The rate of land imports depends on the distance of the trading post from the border town:
Distance    Import rate
    1           3.0
    2           3.0
    3           2.8
    4           2.8
    5           2.4
    6           2.4
    7           1.7
    8           1.7
    9           0.9
   10           0.9
   11           0.3
   12           0.3
These figures are for comparison only; the actual rate will rise and fall. The border town must develop with a road connection for 2-8 months before it is ready to commence trade. Once a trading post has been designated as the trade point, no other trading post will import from the same neighboring province.
The rate of sea imports depends on how efficiently the trade ships are processed. Each ship carries 15 units of goods, which is the full capacity of a warehouse. When a ship lands at port it drops its cargo, rests at the port for some time, then heads straight toward the exit point of its trade route, without continuing its path. Once it leaves the province, it will return after a fixed amount of time.
Thus the most important factor is the placement of the port. Allowing the ship to dock earlier in its journey will shorten the turnaround time. Each sea trade partner sends out two groups of ships that follow different routes, both of which can be serviced. The rate can be improved further by placing a shipyard adjacent to the port. This reduces the time spent in port, and thus the round trip, by one month. Unlike work camps and warehouses, shipyards can be built almost anywhere; however they do no good unless adjacent to the port. Thus, the overall import rate may vary greatly: rates over 3 units/month to less than 1 unit/month have been observed. As with land imports, the port may need to lie idle for months before ships will stop at it.
Clearly, ship paths need to be studied carefully before constructing ports and shipyards. This is best done at the beginning of the province assignment, before building anything. Watch ship movement from month to month and note the optimal place for a port, leaving enough room for a road, a shipyard, and at least two warehouses. It is sometimes possible to place a shipyard that serves more than one port, and it is sometimes possible to place a port that serves more than one trade vessel. Be sure to test the port to ensure the ships will take. Then reload your save game and proceed at your own pace.
2. PROVINCE BUILDINGS
Farms, mines, quarries, trading posts, border towns, and ports must be connected by road to the main city in order to work. The connecting road must not have any gates; gates are equivalent to breaks in the road. In the case of border towns and ports, they may need to be connected for the better part of a year before they become active. Work camps, warehouses, shipyards, and the edge of the map do not need road access and gain nothing from it. Those buildings need only be adjacent (radius 1) to their parent buildings; for this, diagonal connection is acceptable.
Structure     Cost   Size   Requires
Road            20      1
Wall            50      1
Fort           500      1
Trading Post   500      2   Border town, road connection
Farm           250      2   Meadow, road connection
Mine           250      2   Rocky area, road connection
Quarry         250      2   Rocky area, road connection
Warehouse      150      1   Farm, Mine or Quarry
Work camp      100      1   Farm, Mine or Quarry
Shipyard       400      2   Port
Port          1000      2   Shore, road connection
3. DEMAND & DISTRIBUTION
Up to eight types of business shops can be built in each province. These work by taking raw materials from the province, processing them in the city, and selling the product to citizens. The productivity of the workshop can be determined from the number of barrels it contains, from 0-7. For maximum productivity the business must have adequate supply of materials, adequate access to workers and adequate access to a market. Additionally there must be adequate demand for the product in the province.
If raw materials are available somewhere in the province, they are transported instantly and invisibly to the workshop as needed. Materials must be stored in a warehouse to be usable; they cannot be taken directly from the source. Businesses prefer warehouses closer to the city and will take supplies from those warehouses first. A working business processes one unit per month, or none if it has no workers. In other words, the number of barrels seen in the workshop is unconnected with the rate of resource consumption.
The road walker sent out by the business must pass by housing to get workers. Without workers, the business will not be able to produce. As time goes by after the walker passes housing, the business loses workers and will complain about it if queried. This is unavoidable with most road layouts, but provided that the walker doesn’t spend too much time away from housing it shouldn’t affect productivity too much. Similarly, the business walker must also pass by markets to achieve maximum productivity. Without markets the business will still work but will be limited in productivity. However, since housing needs markets to develop anyway, getting the business walkers to pass markets should not be a problem.
The final consideration is the demand for the goods being produced. If demand for the product is not high enough, the business will run at less than optimal productivity. Demand can be increased by opening up trade routes, by connecting to Roman towns in the province, and by increasing the city population. The industrial tax rate also has an effect on demand; lower taxes increase demand, although this may defeat the purpose of cultivating industry: generating tax revenue. At the upper limit, taxes should not be set above 7-8%
It is important to understand that the city does not buy imports or sell exports as in Caesar III; the city collects taxes on goods sold, and the productivity of businesses indicates the rate at which goods are being sold. Always make sure that your businesses are paying their taxes by keeping them covered by forum walkers.
4. MANAGING EMPLOYMENT
The population of the city and the employment rate can be monitored month to month with the census (C key) or the Finance Advisor in the Forum. Keeping the ideal amount of citizens employed will be a challenge, especially during the early growth stages of the city. There are four components to the workforce:
Essential services
These are jobs that need to be filled to maintain and develop housing levels. The forum workers needed for the forum that will serve a Communal Hut would fall into this example. As housing evolves and more services are required, the proportion of workers needed to fulfill essential services will increase.
- Industry: These workers fill out the workshops that produce goods. Since goods are not required to develop the city, it is possible to omit the industrial sector. However, since industry is such a good employer and also produces revenue, you will want to develop this sooner or later. There are limits to how many can be employed by industry, which depend on the availability of materials, the demand for product, and suitable building space in the city. The practical upper limit is about 50% industrial employment. Industry is the first to suffer in the event of a worker shortage.
- Conscription: Conscripted citizens are transferred into army service. Not only does this strengthen your cohorts, but it also provides a no-effort buffer against unemployment. Conscripted citizens are considered employed even before their training is complete. If set too high it will lead to unrest, however. Typically fledgling cities have a worker shortage, so eliminating conscription when beginning a province is advised. Conscription is freely set from 0% to 50%.
- Culture padding: Later provinces will have culture ratings that are unattainable by building essential services and non-employing amenities alone. The city will require large numbers of extra entertainment and worship structures to raise Culture. These buildings are significant employers and, if the highest levels of culture are desired, will take up all the extra workers that might have been unemployed or conscripted. If unemployment is too high, unrest will arise. If not enough workers are available, industrial productivity suffers across the board. City services seem unaffected, though. The ideal level of employment is somewhere between 90-99%. (If the population is below 50, the employment rate will always be 100%.)
5. MANAGING PLEBS
Plebs are required to do all the maintenance work in your province. They are also required for working your farms, mines and quarries. And in emergencies, they can be pressed into army service. They are made available by investing in the pleb fund, through your Pleb Advisor in the Forum.
Work                Required plebs
Construction work   20, always
Fire prevention     1 per 8 tiles of buildings (excluding roads, walls, water, baths, amenities)
City roads          1 per 8 city Road/Plaza/Gateway units
City water          2 per Fountain, 2 per Baths
City walls          1 per 8 city Wall units (excluding towers)
Provincial work     30 per Work camp
Army duty           None (assign as desired)
Failure to assign the required plebs to work will result in various problems: roads and walls crumble, water service breaks intermittently, and production of goods is reduced. Perhaps the most serious problem is the outbreak of fires if not enough plebs are on fire duty; however, this is also the least likely problem to occur. In the event that there are not enough plebs to cover all the work, it’s usually best to skimp on fire prevention for that one month, unless the shortfall is very large (>25%) in which case you should reevaluate the pace of your construction work.
The final number of plebs you get for your money decreases as you invest more money. It varies from about 7 plebs per Dn. down to 4 plebs per Dn. in the range of 10-100 Dn., the range encountered in normal gameplay.
The number of plebs available increases gradually each month until it reaches its steady state. The greater the difference in number between the currently available plebs and the final plebs, the more you gain each month.
It’s important to remember that plebs are not residents of your city. They do not count towards your population, do not pay taxes, and do not affect the employment or unemployment of your citizens.
IV. GUIDE TO DEFENSE
1. CITY SECURITY
There are two threats to peace and order in the city: rioters and invaders. Both riots and invasions proceed by destroying property indiscriminately until they are violently suppressed. Walkers sent out by prefectures or barracks and sentries produced by wall towers will kill any threat they see.
Rioting is caused by unrest, which can be viewed in the city overlays. The higher the unrest, the greater chance that rioting will break out. Flare-ups of unrest are difficult to predict, but the causes of unrest are clear: High unemployment, high conscription, high taxes and low housing development all contribute.
If invaders reach the city, they disappear from the province view and appear on the city map in greatly reduced numbers and strength. If the province defenses are not strong enough it may be necessary to bring the fight to the city level, since proper city defenses should eliminate them easily.
Properly managing a province will always prevent violence in the city, and violence in the city should always be avoided because it will result in a penalty to the Peace rating. Since, housing development requires both internal and external security coverage. This means that you should be prepared to deal with threats even if they aren’t expected just by providing services to your housing.
2. PROVINCE SECURITY
There are two threats to peace and order in the province: uprisings and invaders. These armies seek to either retake your Roman towns or invade the main city, and will destroy any other province structures they encounter. In addition to causing economic damage, enemies also reduce the Peace rating for each piece of property destroyed and each successful city or town invasion. The incidence of barbarian events seems to be random, but there is a grace period of a few years at the beginning of the assignment when they won’t occur.
When the province mission is begun, there is always at least one town on the map controlled by natives. Ultimately you will want to convert these to Roman towns in order to improve commerce and the Empire rating, but the natives can only be brought over by the force of your cohorts. To successfully attack these towns it helps to know their strength. This is determined by querying:
Town strength    Defending force
Weak Tribe       150 Light infantry
Local Tribe      300 Light infantry
Strong Tribe     450 Light infantry
Powerful Tribe   600 Light infantry
Left unmolested, these tribal towns occasionally send out uprisings to attack the main city. The strength of the uprising is about half that of the defending force and is made up of an assortment of troops. The race of the uprising army depends on the current province. (See section VII.)
Invaders are armies from neighboring provinces. There are two kinds: "barbarians," which attack the main city, and "raiders," which attack Roman towns. The type is indicated in the cutscene that announces the invasion. Any Roman town invaded by raiders reverts to a tribal town and the raiding force disappears. Only enemy-controlled provinces send invaders; provinces that have already been made Roman pose no threat. The race of the enemy army is the native race of the province of origin. "Local Waters" and "Trade Routes" are not considered Roman and do send attackers. Their barbarian races are:
Local Waters          Numidians
Trade Route (Silk)    Arabs
Trade Route (Ivory)   Mauri
Trade Route (Spice)   Huns
Invaders may enter the province from any point on their border. It is not always near the trade entry point.
There are two mechanisms of defense: Cohorts and walls. Cohorts are the divisions of your army. Walls are fortifications that delay the progress of enemy armies for several months, giving time for your army to engage them or build up more strength.
There are two strategies for walls that can be used singly or together: Building walls far out, near the edge of a hostile province, and building walls close in around strategic assets. Walls can be complemented by mountains and hills, which are impassable. Neither friendly nor hostile armies can pass through walls, but your cohorts can go through gates or forts built in to the wall. Enemy armies are not very smart about moving around walls and tend to overlook the holes that are necessary to maintain economic connections.
Ensure that your forces are strong enough to eliminate the army before engaging, because the enemy will not stop attacking until it is wiped out. To command cohorts, select one with the selection tool and click the movement button, then click on where the army should move. If the distance is large, the path will require multiple waypoints. Try to use roads, or build roads on the path because armies move at double speed over roads. Enemies also benefit from roads, so consider deleting them from under their feet if more time is needed.
It is possible to maneuver cohorts all the way onto the shore or the edge of the map, locations that cannot be built on. However, it is not always necessary to command the cohort on top of the enemy because a cohort will pursue and engage nearby enemies automatically, provided the cohort readiness is high enough. When the enemy is engaged, you are given the choice to lead the battle personally in real-time strategy mode, or leave the computer to calculate the winner of the battle from the size and morale of the armies.
3. COHORT MANAGEMENT
Successful defense will require preparing cohorts strong enough to counter threats and moving the army into position to engage the enemy. There are four types of soldiers: Heavy infantry are professionals paid for by a fund set aside with the Centurion advisor in the Forum. The actual cost of soldiers depends on the province. Light infantry are conscripts drafted from the city population; the conscription rate is also set with the Centurion. Slingers are plebs converted to low quality missile soldiers. Finally, auxiliaries are local mercenaries the type of which depends on the province; for those provinces that have auxiliaries, only 400 are available in total.
Soldier type      Monthly maintenance cost     Training rate
Heavy infantry    5 Dn. for 60-100 soldiers    20 per month per active cohort
Light infantry    None                         40 per month per active cohort
Slingers          1 pleb for 1 soldier         80 per month per active cohort
Auxiliaries       20 Dn. for 50 soldiers       All ready in 1 month
Heavy infantry are far more cost effective than slingers or auxiliaries both in numbers and effectiveness, but the difficulty is in the slow training rate. Because of this, slingers and auxiliaries should only be used in emergencies. Typically the only suitable duty from which plebs can be pulled is provincial work, so expect this to have an impact on the trade economy. Light infantry should be increased in times of unemployment and reduced otherwise. This leaves heavy infantry as the only type that you have real control over. Avoid resorting to expensive measures by building up heavy infantry gradually to be ready for barbarian threats. Note that barracks are not necessary for training any type of soldier.
The Centurion gives an overview of readiness and morale for each cohort. Morale affects the performance of the troops in battle. It is raised by winning battles and lowered by losing or retreating from battles. Readiness is a function of the number of troops in the cohort; if readiness is high enough the cohort will move and engage nearby enemies independently, though this can always be ordered manually.
In reviewing each cohort, it is possible to raise or lower the priority of each fort, to control number of troops sent to each one when trained. Forts are Normal by default, each getting equal numbers, but the troop allocation can be doubled, halved, or cut off altogether. This allows you to, for example, better fortify a higher risk region of province. Changing a fort’s priority does not move any troops already assigned to the fort; only new troops are affected.
Fort priority     Number of troops assigned
Major             Double normal amount
Normal            No. of troops divided by no. of forts, by default
Minor             Half normal amount
Demobilized       None
The final consideration is the number of cohort forts to build in the province. The sole reason for building more than one is to shorten the time needed for troops to reach a target; the longer the threatened border, the more forts required. The maximum is 10, though you will never need or want this many. More forts means more troop assignment micromanagement, and leads to higher overhead to maintain multiple forts at sufficient readiness.
Therefore the ideal number of forts is one, placed such that its troops can quickly reach the most likely areas to be threatened. Judicious placement of walls and roads can help in this regard. However, depending on the number of hostile neighbors and the overall length of threatened border, it still may be necessary to build one or two additional forts.
V. DEALING WITH CAESAR
1. FAVOR
Caesar will impose himself in your affairs in three ways: by demanding yearly tribute, by taxing your personal savings, and by making resource requests of your province. At least one of these actions, in addition to the Empire rating, is affected by the imperial favor, that is, Caesar’s opinion of you. Favor starts at a neutral level and decreases slightly every year. It can be raised by sending personal gifts or by meeting Caesar’s special requests. It is reduced by failure to pay tribute, failure to deliver requests, and sending gifts that are too small. Caesar’s favor is determined from the words of the Imperial advisor in the Forum:
"Dangerously bad, sir."
"Bleak, very bleak, sir."
"He's not happy, sir."
"You're out of favor, sir."
"It has been better, sir."
"He's indifferent to you."
"There's interest in you."
"He's very pleased."
"He mentions you often."
"He talks of no one else!"
"He regards you as family!"
2. GIFTS
Giving gifts is one of the few ways to improve imperial favor; however, deciding how much to give is not easy. The effect of giving a certain amount of money depends on the average of all prior gifts given, and possibly other factors. Giving less than the average is always bad. When Caesar receives a gift, his approval can be determined from his reply:
"Normally, bribes are worth more than the pleb who delivers them. You insult me with such paltry sums!"
"Thanks for the kind gift. I shall be sure to use it to purchase a grape at the next festival."
"Your gift has been received. Thank you."
"Your thoughtfulness is much appreciated. Long life."
"I so enjoy these correspondences. My gratitude for your favors to the Empire."
"Your generosity touches me. Rome needs more leaders like yourself."
"Gifts such as these are more than I could hope for. The Empire thanks you!"
Try for the third or fourth reaction. If too little is given, Caesar will be displeased. If too much is sent the average gift amount will be raised more than necessary and make future gift giving more costly. Experiment with different amounts (after saving) to determine the optimum amount. Caesar’s favor and the average gift amount is preserved between provinces; they are not reset to defaults. Therefore, poor dealings with Caesar early in the game can cause problems later. The best strategy to keep both under control is to give infrequent, small gifts to keep favor around or slightly above neutral.
3. TRIBUTE
Every 2-6 years, Caesar either raises or lowers your yearly tribute. At least two factors determine this: A larger amount of funds in the treasury increases tribute, and a higher imperial lowers tribute. The tribute can be manipulated by sending a gift at some time before the end of the year in order to raise favor. Paying tribute is not difficult if the city is being managed properly because the amount is small compared to other costs. Therefore, inability to pay tribute is a sign to Caesar of serious trouble; three years of nonpayment will result in your removal. This can be avoided by simply staying out of debt. As long as the city is not in debt at the end of the year and a small amount of tax revenue is coming in, there will be enough money to pay it. 4. TAXES Caesar taxes a portion of your personal savings after the first year of governing, and every 5-6 years thereafter. The tax-bracket depends on the amount in your savings at the end of the year.
Notice                                                    Savings    Tax
(no tax)                                                   0-2999     0%
"For this year's Imperial tax, I have decided to be     3000-4999    10%
lenient on you."
"I hope this year's imperial tax is to your liking.     5000-7999    19%
It certainly is to mine!"
"This year's Imperial tax befits a Governor as              8000+    26%
successful – and wealthy – as yourself."
The only way to avoid taxes is to pour the money out of savings and into the city funds. If the city is not yet developed and the savings amount is not very large, this may be less costly than paying taxes. For example, if there is 30000 Dn. in savings and at least that much needs to be spent on construction, you should donate at least 27001 of it to avoid paying up to 7800 in tax. The lost savings can be reaccumulated over several years when the city becomes profitable. On the other hand, if there is 100000 Dn. in savings it will take too long to recover all of it; it would be better to pay taxes on the part of it that is not needed and keep the rest. In short, donate all the money you intend to spend before the end of the first year, and prepare adequate money storage to avoid robberies.
5. REQUESTS
Ten years after beginning an assignment, and every 10 years thereafter, Caesar requests a quantity of raw materials from your province. (Though he will not make requests if you have not begun to develop industry.) He never asks for goods that must be imported, only locally producible goods. The specific type and quantity (5-10) are determined randomly at the time of the request, so you can reload to before the end of the year to try for a more convenient request. You cannot stockpile and send the items at leisure; you must choose the amount to send and send them immediately. Meeting Caesar’s demand will result in a moderate increase in favor. It is unknown if exceeding the demand results in extra favor. If you fail to fully meet the request you are given another opportunity the following year.
If you finish all the assignments Caesar gives you, and become the next Caesar, you can continue playing as Caesar. In this case, the favor is always maximum and you will never be bothered by tribute, taxes or requests.
VI. CITY BUILDING STRATEGY
1. DEVELOPMENT PRIORITIES
Should housing or industry be developed first? Ideally both, but this approach presents several problems:
- The minimum investment to get a business running can be costly, depending on the source of the materials.
- Local production of materials (the cheapest and fastest source) requires large numbers of plebs, which are in short supply in the beginning months of a province assignment. This is made worse by the needs of fire prevention, road, water service and wall maintenance that a fast growing city needs.
- Demand for business goods is low when the population is small and there are few Empire connections.
- Business workshops require a large population for workers.
- Rapidly developing housing causes the supply of workers to fluctuate due to the periodic drops in population density as houses evolve. This can wreak havoc on the staffing of businesses.
Thus it is apparent that business without housing is unfeasible. But due to unemployment concerns, housing without business is undesirable. Therefore there are two ways to develop that incorporate both.
- A) Evolve housing as quickly as possible, adding businesses gradually to keep unemployment within an acceptable range.
- B) Evolve housing to an optimal point that provides a large population for a small investment, and develop industry as quickly as possible.
Method A pays out more in tax revenue and makes the city profitable sooner, but it is the most costly approach; even with a small neighborhood of ~1000 citizens it will cost more than any available starting funds to develop top level housing as well as a few businesses. Method B is more moderate; it pays less in tax but requires smaller investment. The method applied should depend on the money available; method A works if a large injection of money from personal funds is provided whereas method B is preferable if the only money is what Caesar has provided.
2. PRECEPTS OF URBAN PLANNING
There are countless ways to actually lay out a city. Rather than adhering to specific tiled plans, it is better to plan a city based on several key principles and then adapt to the requirements at hand.
- The city should be designed around the houses, not around any expensive or important-looking structure, because housing is what makes or breaks a city.
- There is no reason why the entire population can’t live in the highest level of housing. Unlike in Caesar III there are no patrician levels of housing occupied by nonworkers. All citizens want and need work in Caesar II. Top level housing is by no means necessary, however.
- The city doesn’t need to be interconnected; the only road connections necessary are those between houses and walker services, and between businesses and houses. This means that the city can be broken up into completely separate neighborhood-like divisions.
- The same neighborhood building plan can be reused over and over, or mixed with larger or smaller layouts.
- The city land is randomly generated at the start of the province. Its only feature is a river that enters one side and exits another. If the river doesn’t cover enough land or takes up too much space, reload to before the promotion and try again.
- Unlike roads, aqueducts and walls cannot branch. In other words, they cannot have 3- or 4-way intersections with themselves. There must be at least 1 tile of space between aqueduct tracts and between wall sections. Roads, aqueducts and walls may all intersect one another, however.
- Attempting to expand a walled-in area or merge separate walled-in areas (by breaking the wall and building new wall) will cause all external security to be lost. The only way to avoid losing external security coverage is to move the wall out 1 tile at a time. Therefore, it is best to make the walled-in area big enough on the first try. It is possible to wall in the entire parcel of land, if that much space is desired.
- It is not necessary to give worship and entertainment structures road and forum access. The buildings still function but they contribute nothing to Culture. Unsecured worship buildings may be robbed, however.
- Building a neighborhood without planning where all the essential service structures will be invariably leads to problems that will hurt its growth. Always draw up your plan first.
3. BUILD NO INTERSECTIONS
Walkers move in a random direction when they reach a fork in the road. Given enough crossings, a walker will eventually neglect to travel a certain path for long enough that some houses will be deprived of service. This leads to unstable housing. One approach to this problem is to build more walker producing buildings. A better solution is to build roads with no intersections. Without intersections, the walker has no chance of missing any housing in his path. The two ways to do this are closed loops and unclosed stretches of road, the latter of which is equivalent to a closed loop with width 1. In other words, it is neither necessary nor desirable to have the entire city unified by a single road network.
Even without intersections, part of the road may not get sufficient coverage because walkers travel a limited distance before disappearing. Therefore, the perimeter of the loop or length of the road section should match the distance traveled by the walkers. If the path is too long, the walker may not reach all the way around; if the path is too short, less coverage is being provided for the same money. Since the shortest distance walked is 28 tiles (markets and businesses) the ideal loop path for these buildings is 28 tiles. This is available in useful shapes such as 6×6, 5×7, 4×8 and 3×9 rectangles. (Interior area given.) It is also effective to make a loop with double size and double services placed on opposite sides of the loop.
4. COUPLING LOOPS
Population density generally increases as housing evolves; at the same time the number of support structures increases. Therefore the ratio of housing space to non-housing space grows smaller and reaches a minimum at the highest development levels. This presents a problem for business buildings, which take up lot of space and require good housing coverage. A single loop isn’t going to have enough space for all the houses, support services and businesses.
By building houses on the exterior of one loop and placing another loop against those houses, walkers from either loop may access the houses. This makes more space available to build walker-producing buildings, useful for accommodating bulky businesses. It is possible to daisy chain multiple loops in this way, to branch loops, or to lay out loop modules in a gridlike way. It works as long as every loop touches houses on the outside. Of course, this technique can be used in any city; it doesn’t require highly evolved houses.
Examples (NOT drawn to scale)
Simple          ......H......
coupling        .    .H.    .
                .    .H.    .
                ......H......


Daisy           ......        ......
chain           .    .H......H.    .
                .    .H.    .H.    .
                ......H.    .H......
                       ......


Branched        ...... ......
with a double   .    . .    .
size loop       .    . .    .
                ...... ......
                    HHHHH
                .............
                .           .
                .           .
                .............


Pseudogrid             ......
of loops        ......H.    .H......
                .    .H.    .H.    .
                .    . ...... .    .
                ......        ......
                  HH            HH
                ......        ......
                .    .H......H.    .
                .    .H.    .H.    .
                ...... .    . ......
                       ......
5. ACCOMODATING LARGE HOUSES
When planning neighborhoods that will have size 2 or size 3 houses, it is important to control how the houses expand from smaller size to larger size so that all the houses have enough room to grow. If this is ignored the houses on the edge of the block may be crowded into a space too small to expand. Example (drawn to scale)
Step 1:  H H H H H H H H
         H H H H H H H H

Step 2:  H |¯¯||¯¯||¯¯|H
         H |__||__||__|H
Botched expansion can be corrected by demolishing the large houses, giving the small ones a chance to expand. Then you will need to build new houses in the gaps, and let them develop. This takes a lot of time and is disruptive to population levels.
Step 3:  H     |¯¯|    H
         H     |__|    H

Step 4:  |¯¯|  |¯¯|  |¯¯|
         |__|  |__|  |__|

Step 5:  |¯¯|H     H |¯¯|
         |__|H     H |__|

Step 6:  |¯¯||¯¯||¯¯||¯¯|
         |__||__||__||__|
Control can be maintained from the beginning by forcing houses to expand from the outside inward, one by one. Interior houses are prevented from expanding by placing non-housing filler within the housing block then removing them once the exterior houses have expanded. Inexpensive structures for this purpose are road or plaza pieces and wells. The holes cannot be left blank because houses will expand into clear land or gardens.
Example (drawn to scale)
Step 1:  H H H H H H H H
         H H . H . . H H

Step 2:  |¯¯|H H H H |¯¯|
         |__|  H . . |__|

Step 3:  |¯¯||¯¯|H H |¯¯|
         |__||__|    |__|

Step 4:  |¯¯||¯¯||¯¯||¯¯|
         |__||__||__||__|
6. PUSHING THE LIMITS OF INDUSTRY
While the potential growth of any city is limited only by the available building space, and the population can be brought well over 10000, employing all those citizens is made difficult by the limited quantity of raw materials available. Ordinarily, farms can only be built on meadow and mines or quarries on can only be built on rocky area. Industry is maxed out when all are built over and producing.
This restriction can be overcome with the following cheat: Select the farm/ mine/quarry tool and press and hold the left mouse button wherever you want it built. Without releasing the left button, click the right button. The structure will be built for the normal cost. This cheat can be further exploited by building two or more close enough together that they share the same work camp. You cannot choose the type of farm/mine/quarry with this cheat. A mine or quarry will be one of the types that are normally available in the province, but in the case of a farm it will always be a wheat farm, even in provinces that have no way of getting wheat. In this case, wheat businesses will be made available for construction to process the goods.
Industrial productivity is ultimately limited by the demand for goods. However, this cheat will go a long way toward employing citizens and increasing tax revenue.
7. MEETING THE OBJECTIVES
The Empire rating is the easiest and first to develop because imperial connections will be needed to grow industry. All it takes is some money to build provincial roads and structures. The only way to fail at achieving 100% is to fall too low in favor, something that is easily corrected with gifts.
The most important factor for Prosperity is to maintain a profit; the profit doesn’t have to be large, as long as the funds at the beginning of the year are greater than the year before. Don’t worry about this until all or most of the construction has been completed. Prosperity may be held back by low population. Plan a big city from the beginning if high Prosperity is required, and always develop housing as high as possible given the building plan.
Peace is the slowest (in game time) to develop. Prevent riots by keeping housing happy, dealing with unemployment month to month, and being reasonable with taxes and conscription. Be ready for external threats and don’t let enemies wreck anything. If something is about to be destroyed in the city or province, use the demolish tool to get rid of it and avoid taking a hit to Peace. Ironically, Peace will develop faster in provinces with more war (hostile neighbors and tribal towns) as long as the cohorts put down the threats immediately; this is due to the 3 point bonus for conquering enemy armies.
Culture requires a large number of expensive structures that will tie up a large segment of the population for employment. If there is a high Culture requirement be sure to leave enough building space and employees for this purpose. This can be done after profitable industry and housing has been established. An easy way to get Culture points is to make all roads plazas instead of ordinary roads. Culture is limited by low population, and it is also easier to develop with larger populations, because there will be more people left over after the required employees are used for industry and essential services. It is possible to build roadworks with no housing, only a forum and culture buildings. This technique is useful if there is no more space left for construction in your layouts and more Culture is desired.
VII. GUIDE TO PROVINCES
1. EXPLANATION
The following section gives the game’s description and the economic and military overview for each of the provinces. The number of meadows and rocky areas is listed, along with what goods can be produced locally. The four trade partners and importable goods are listed in order of north, east, south, and west, as is done by the trade advisor. "L" is for land and "S" is for sea. The towns are listed in order of barbarian strength. The number of heavy infantry hired for 5 Dn. per month is given, along with the auxiliaries available and the type of natives present.
2. LIST OF PROVINCES
Campania
Thanks to our recent campaigns, the people of this province have been "Romanized".They should be placid and welcoming.
Meadows                 5  Cattle
Mines/Quarries          4  Lead, Copper, Stone
Illyricum               S  Cattle
Achaea                  S  Clay
Sicilia                 S  Iron
Latium                  L  Grapes

Towns            Roman, Roman, Roman, Weak
Heavy infantry   100
Auxiliaries      None
Natives          Lucanians
Cisalpine Gaul
This province is fairly quiet, but beware the occasional incursions of the Goths to the north.
Meadows                 6  Wheat
Mines/Quarries          4  Iron, Copper, Sand
Germania Superior       L  Wool
Illyricum               L  Cattle
Latium                  L  Grapes
Gallia Narbonensis      S  Cattle

Towns            Roman, Roman, Roman, Weak
Heavy infantry   100
Auxiliaries      None
Natives          Etruscans
Corsica and Sardinia
Your mission is to manage the small island of Sardinia, to the west of Rome. One of the outlying villages has not been tamed, so rule with caution.
Meadows                 4  Wheat, Grapes
Mines/Quarries          3  Lead, Stone
Gallia Narbonensis      S  Cattle
Latium                  S  Grapes
Sicilia                 S  Iron
Trade Route             S  Ivory

Towns            Roman, Roman, Roman, Local
Heavy infantry   95
Auxiliaries      None
Natives          Corsicans
Illyricum
Mineral resources are not plentiful here, but the people recognize our right to rule more than most of these barbarian lands.
Meadows                 5  Cattle, Wool
Mines/Quarries          2  Lead, Stone
Cisalpine Gaul          L  Sand
Macedonia               L  Copper
Trade Route             S  Silk
Latium                  S  Grapes

Towns            Roman, Roman, Weak, Local
Heavy infantry   85
Auxiliaries      Gauls (Swordsmen)
Natives          Dalmatians
Sicilia
There is a slight barbarian presence in this province, but it is a prime trading area with access to the spice routes.
Meadows                 4  Wheat, Grapes
Mines/Quarries          4  Iron, Marble
Corsica and Sardinia    S  Wheat
Campania                S  Copper
Trade Route             S  Silk
Carthage                S  Wheat

Towns            Roman, Roman, Roman, Local
Heavy infantry   90
Auxiliaries      None
Natives          Sicilians
Pannonia
The people here are strong, but seem willing to join the Empire. Beware invasions from the north.
Meadows                 4  Cattle, Wool
Mines/Quarries          4  Iron, Clay
Noricum Exterior        L  Wheat
Dacia                   L  Lead
Illyricum               L  Cattle
Cisalpine Gaul          L  Sand

Towns            Roman, Weak, Local, Strong
Heavy infantry   85
Auxiliaries      Armenians (Horse archers)
Natives          Pannoniae
Dacia
The soil is quite fertile here, but the barbarian population is significant. Expect trouble.
Meadows                 6  Wheat, Wool
Mines/Quarries          2  Lead, Sand
Pannonia Exterior       L  Wool
Thracia                 L  Copper
Macedonia               L  Copper
Illyricum               L  Cattle

Towns            Roman, Weak, Local, Strong
Heavy infantry   75
Auxiliaries      Gauls (Spearsmen)
Natives          Scordiscans
Macedonia
This province is suited for cattle and wheat. Beware the Greeks to the south.
Meadows                 4  Wheat, Cattle
Mines/Quarries          4  Copper, Stone
Illyricum               L  Cattle
Caria                   S  Marble
Achaea                  L  Clay
Campania                S  Copper

Towns            Roman, Roman, Local, Strong
Heavy infantry   80
Auxiliaries      Gauls (Swordsmen)
Natives          Macedonians
Carthage
This region’s once-great cities have been razed. Rebuild this province to even greater splendor, but beware a fierce and unruly populace.
Meadows                 4  Wheat
Mines/Quarries          4  Iron, Copper, Sand
Sicilia                 S  Iron
Africa Proconsularis    L  Sand
Trade Route             L  Ivory
Mauretania              L  Wheat

Towns            Roman, Roman, Weak, Weak
Heavy infantry   70
Auxiliaries      None
Natives          Carthaginians
Africa Proconsularis
Minerals are less prevalent here, and unrest is likely to be a problem. Exercise caution when governing here.
Meadows                 4  Cattle
Mines/Quarries          2  Copper, Sand, Marble
Sicilia                 S  Iron
Cyrenaica               S  Gems
Trade Route             L  Ivory
Carthage                L  Wheat

Towns            Roman, Weak, Local, Strong
Heavy infantry   75
Auxiliaries      Gauls (Swordsmen)
Natives          Blemmyes
Gallia Narbonensis
This province contains a village of those rebellious Gauls; however, they should be fairly peaceable for their lot.
Meadows                 4  Grapes, Cattle
Mines/Quarries          4  Iron, Marble
Aquitania               L  Grapes
Cisalpine Gaul          L  Sand
Local Waters            S  Fish
Hispania Tarraconensis  L  Clay

Towns            Roman, Roman, Roman, Local
Heavy infantry   90
Auxiliaries      None
Natives          Gauls
Belgica
There is a significant barbarian presence in these lands, but they seem more passive than most. The true threat must lie farther north.
Meadows                 5  Wheat, Cattle
Mines/Quarries          3  Lead, Clay
Britannia               S  Iron
Germania Superior       L  Wool
Cisalpine Gaul          L  Sand
Gallia Lugdunensis      L  Cattle

Towns            Roman, Roman, Local, Powerful
Heavy infantry   80
Auxiliaries      Macedonians (Pikemen)
Natives          Belgae
Germania Superior
This northern province contains a large barbarian population, but its resources seem worth the danger.
Meadows                 5  Wheat, Wool
Mines/Quarries          4  Lead, Clay
Germania Inferior       L  Wheat
Pannonia                L  Cattle
Cisalpine Gaul          L  Sand
Belgica                 L  Lead

Towns            Roman, Weak, Weak, Strong, Strong
Heavy infantry   75
Auxiliaries      Armenians (Horse archers)
Natives          Chatti
Achaea
The Greeks’ constant squabbling have made it easy for us to conquer them. However, that same contentious behavior will make them difficult for you to rule.
Meadows                 4  Grapes
Mines/Quarries          4  Lead, Iron, Clay
Macedonia               L  Copper
Trade Route             S  Silk
Creta                   S  Marble
Campania                S  Copper

Towns            Roman, Roman, Strong, Strong
Heavy infantry   70
Auxiliaries      Gauls (Swordsmen)
Natives          Greeks
Germania Inferior
Farmland seems plentiful here, but the barbarians are also plentiful and unwilling to join the Empire.
Meadows                 6  Wheat, Cattle
Mines/Quarries          1  Iron, Sand
Local Waters            S  Fish
Germania Superior       L  Wool
Belgica                 L  Lead
Britannia               S  Iron

Towns            Roman, Strong, Strong, Strong
Heavy infantry   70
Auxiliaries      Armenians (Horse archers)
Natives          Frisians
Gallia Lugdunensis
The further north we expand, the fiercer the Gauls become. However, this region features some of the richest farmland the Empire has ever seen.
Meadows                 6  Cattle, Wool
Mines/Quarries          2  Iron, Clay
Britannia               S  Iron
Belgica                 L  Lead
Aquitania               L  Grapes
Hispania Tarraconensis  S  Clay

Towns            Roman, Roman, Local, Strong
Heavy infantry   75
Auxiliaries      Mauri (Bowmen)
Natives          Gauls
Britannia
This remote and rather rustic island offers some worthwhile exports, but will have to remain well-defended to keep its rebellious populous at bay.
Meadows                 4  Wheat, Cattle
Mines/Quarries          5  Iron, Clay
Caledonia               L  Cattle
Belgica                 S  Lead
Gallia Lugdunensis      S  Cattle
Hibernia                S  Wool

Towns            Weak, Weak, Strong, Powerful
Heavy infantry   70
Auxiliaries      Mauri (Bowmen)
Natives          Britons
Thracia
This culture seems ripe for assimilation into our Empire, but the threat of attack from the north looms over it.
Meadows                 4  Grapes, Cattle
Mines/Quarries          4  Copper, Clay
Dacia Exterior          L  Lead
Caria                   S  Marble
Trade Route             S  Silk
Macedonia               L  Copper

Towns            Roman, Weak, Local, Strong
Heavy infantry   85
Auxiliaries      Gauls (Swordsmen)
Natives          Thracians
Cyrenaica
This region is rich in gems and other minerals, but among the mountains lie many dangerous nomadic tribes.
Meadows                 2  Cattle
Mines/Quarries          5  Gems, Clay, Marble
Creta                   S  Marble
Aegyptus                S  Wheat
Trade Route             L  Ivory
Africa Proconsularis    L  Sand

Towns            Weak, Weak, Local, Strong
Heavy infantry   80
Auxiliaries      Gauls (Spearsmen)
Natives          Blemmyes
Aquitania
The Gauls may have an important presence here, but they are more — civilized — than most of their kind. Resources are plentiful here.
Meadows                 5  Grapes
Mines/Quarries          4  Lead, Copper, Stone
Gallia Lugdunensis      L  Cattle
Gallia Narbonensis      L  Cattle
Hispania Tarraconensis  L  Clay
Local Waters            S  Fish

Towns            Roman, Roman, Weak, Local
Heavy infantry   85
Auxiliaries      Macedonians (Pikemen)
Natives          Gauls
Lusitania
Surveyors report the soil here to be rich with ores and gems, and the seas a prime source of fish.
Meadows                 5  Wool
Mines/Quarries          4  Gems, Copper, Stone
Britannia               S  Iron
Hispania Tarraconensis  L  Clay
Baetica                 L  Grapes
Local Waters            S  Fish

Towns            Roman, Roman, Weak, Local
Heavy infantry   80
Auxiliaries      Egyptians (Swordsmen)
Natives          Celtiberians
Baetica
This province allows enemies to reach the Empire from the south. Taming it would limit their incursions, but the people here seem displeased with our presence.
Meadows                 5  Grapes, Cattle
Mines/Quarries          4  Lead, Marble
Hispania Tarraconensis  L  Clay
Mauretania              S  Wheat
Trade Route             S  Silk
Lusitania               L  Wool

Towns            Roman, Roman, Weak, Local
Heavy infantry   75
Auxiliaries      Egyptians (Swordsmen)
Natives          Celtiberians
Mauretania
As a southern province, this area would give us access to the ivory and spice trading routes. Meadows 4 Wheat Mines/Quarries 4 Iron, Copper, Marble Baetica S Grapes Carthage L Wheat Trade Route L Silk Trade Route L Ivory Towns Roman, Roman, Local, Local Heavy infantry 80 Auxiliaries Egyptians (Spearsmen) Natives Mauri Caria This region looks promising, but the further east we expand, the more powerful our enemies seem to become.
Meadows                 3  Cattle
Mines/Quarries          4  Iron, Marble, Stone
Thracia                 S  Copper
Lycia and Pamphylia     L  Wheat
Cyprus                  S  Grapes
Achaea                  S  Clay

Towns            Roman, Roman, Local, Strong
Heavy infantry   80
Auxiliaries      Chatti (Spearsmen)
Natives          Seleucids
Creta
This island is small, yet rich in farmland and minerals. However, the populace may be troublesome.
Meadows                 4  Grapes, Cattle
Mines/Quarries          4  Iron, Marble
Achaea                  S  Clay
Caria                   S  Marbles
Cyrenaica               S  Gems
Trade Route             S  Silk

Towns            Roman, Roman, Local, Strong
Heavy infantry   75
Auxiliaries      Gauls (Spearsmen)
Natives          Cretans
Aegyptus
With the capacity for wheat farming in this province, this may be the Empire’s new bread basket. However, its inhabitants are less than welcoming.
Meadows                 4  Wheat
Mines/Quarries          3  Lead, Sand, Marble
Lycia and Pamphylia     S  Wheat
Judea                   L  Copper
Trade Route             S  Ivory
Cyrenaica               L  Gems

Towns            Roman, Local, Strong, Strong
Heavy infantry   70
Auxiliaries      Gauls (Spearsmen)
Natives          Egyptians
Lycia and Pamphylia
This province contains some villages that may cause some trouble, but overall it seems fairly quiet.
Meadows                 4  Wheat
Mines/Quarries          4  Lead, Stone, Clay
Bithynia and Pontus     L  Grapes
Cappadocia              L  Iron
Aegyptus                S  Wheat
Caria                   L  Marble

Towns            Roman, Roman, Strong, Powerful
Heavy infantry   85
Auxiliaries      Chatti (Swordsmen)
Natives          Cilicians
Cappadocia
The people here are prone to rebellion, and have settled in many of the outlying towns. You must pacify the province, if you hope to keep peace in your city.
Meadows                 4  Cattle, Wheat
Mines/Quarries          4  Iron, Marble
Bithynia and Pontus     S  Grapes
Armenia                 L  Grapes
Syria                   L  Sand
Lycia and Pamphylia     L  Wheat

Towns            Roman, Weak, Strong, Powerful
Heavy infantry   70
Auxiliaries      Blemmyes (Bowmen)
Natives          Galatians
Cyprus
Resources are scarce on this small island, and the people look to be difficult to manage. Maintain vigilance.
Meadows                 4  Grapes, Cattle
Mines/Quarries          2  Copper, Clay
Lycia and Pamphylia     S  Wheat
Syria                   S  Sand
Aegyptus                S  Wheat
Trade Route             S  Silk

Towns            Roman, Weak, Weak, Strong
Heavy infantry   70
Auxiliaries      Gauls (Swordsmen)
Natives          Cypriots
Germania Exterior
We’ve beaten back those upstart barbarians, and these lands are bereft of minerals. Perhaps it’s best to leave sleeping dogs lie?
Meadows                 4  Wheat
Mines/Quarries          1  Lead, Iron, Clay
Caledonia               S  Cattle
Local Waters            S  Fish
Noricum Exterior        L  Wheat
Britannia               S  Iron

Towns            Weak, Weak, Local, Strong
Heavy infantry   65
Auxiliaries      Armenians (Horse archers)
Natives          Saxons
Noricum Exterior
Many barbarians have resettled in this area, thanks to our recent campaigns. Expanding into these lands would only give them a chance at revenge — in my humble opinion.
Meadows                 3  Wheat, Wool
Mines/Quarries          4  Iron, Stone
Germania Exterior       L  Lead
Pannonia Exterior       L  Wool
Germania Superior       L  Wool
Germania Inferior       L  Wheat

Towns            Weak, Strong, Powerful, Powerful
Heavy infantry   60
Auxiliaries      Armenians (Horse archers)
Natives          Alamanni
Pannonia Exterior
Aside from imported silks, is there anything to be gained from this province but bloodshed?
Meadows                 3  Wheat, Wool
Mines/Quarries          4  Lead, Clay
Trade Route             L  Spices
Dacia Exterior          L  Lead
Dacia                   L  Lead
Noricum Exterior        L  Wheat

Towns            Strong, Powerful, Powerful, Powerful
Heavy infantry   65
Auxiliaries      Armenians (Horse archers)
Natives          Vandals
Dacia Exterior
Our scouts in Dacia indicate that this area would be extremely difficult to tame, though its silk trade and fishing waters are tempting.
Meadows                 3  Wheat, Wool
Mines/Quarries          5  Lead, Stone
Trade Route             L  Spices
Local Waters            S  Fish
Thracia                 L  Copper
Dacia                   L  Lead

Towns            Local, Strong, Powerful, Powerful
Heavy infantry   60
Auxiliaries      Egyptians (Swordsmen)
Natives          Visigoths
Information on the following provinces is missing:
- Judea
- Syria
- Caledonia
- Hibernia
- Asia Exterior
- The three provinces at the east border of the map
Used with permission – thank you jk
7 Comments »
RSS feed for comments on this post.
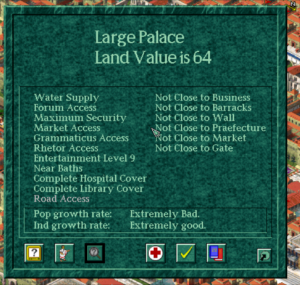
When you say Entertainment 4, what does this mean? How Do i get Entertainment 4?(see the housing development requirements table under Housing Evolution / Improved Insula)
Comment by Richard H — April 6, 2018 @ 3:57 pm
When you right-click on any map tile and click on the question-mark you will see what the current entertainment level is for that area. Overlapping coverage of different entertainment sources – Odeums, Theaters, etc add to the Entertainment level for each map tile covered. This screen-shot shows the ideal level:
Comment by Site Administrator — April 19, 2018 @ 10:45 pm
Oh awesome, thank you so much!
Comment by Richard H — April 23, 2018 @ 8:30 pm
Caledonia- “Are you sure this is a good idea? Shouldn’t we just wall off the northern border of Britannia and be done with it?”
Hibernia- “This tiny empire may be good for little else but fish and frustration. Emperor, its inhabitants will bring you nothing but trouble.”
Comment by Norvaal — May 7, 2018 @ 9:39 am
I am still playing in 2020. Thanks for keeping this site up 🙂
Comment by Richard H — May 20, 2020 @ 6:29 am
Ave and gratias!
Your site is an invaluable source of knowledge about this magnificent game (I like it even more than Caesar III).
Cheers from the faraway Scythia.
Comment by Saevius — August 28, 2024 @ 5:57 pm
This forum made me play again in 2024!
Syria – This province is poised to become the most prosperous one in the region, with plenty of farming and mineral resources.
Judea – Discontent is high in this area, which will make exploiting its resources difficult.
Armenia – Surveys show little in the way of resources, and resistance to the Empire is strong here.
Mesopotamia – This region is a dangerous mix of excellent mineral resources and rebellious villages. Exploit the trade routes and defend your capital city.
Comment by Derrek — September 7, 2024 @ 2:04 am